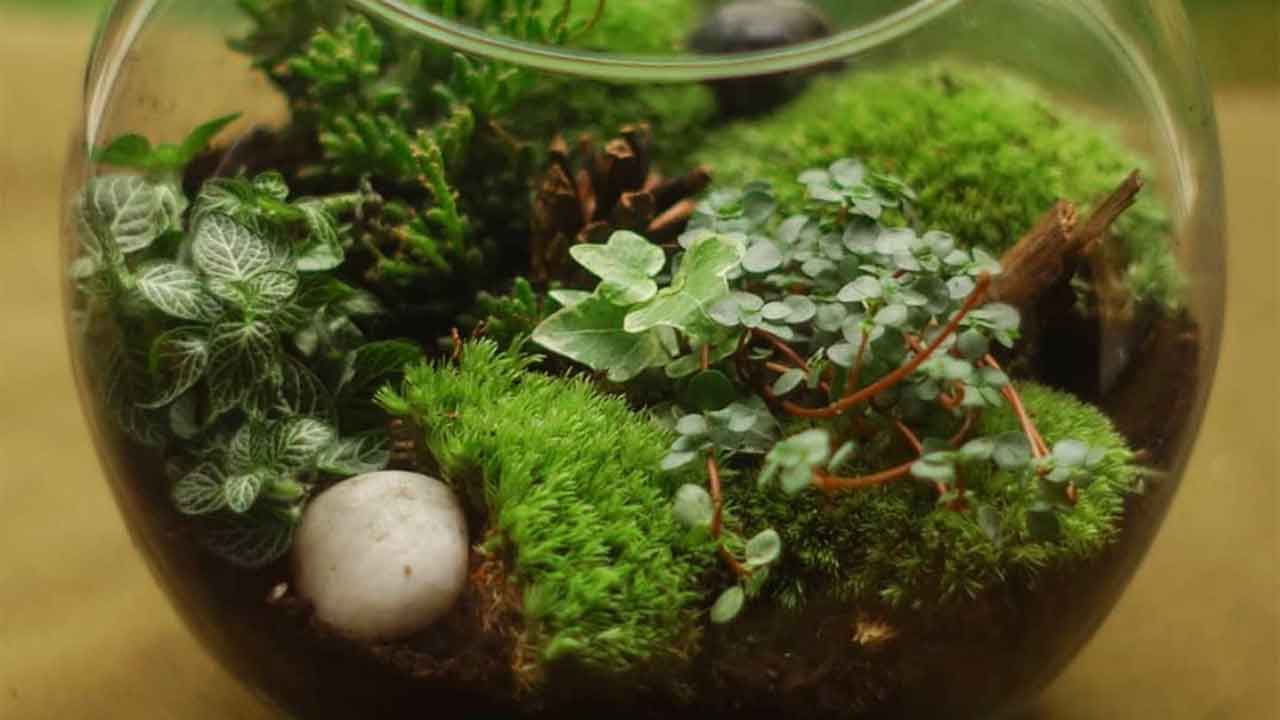
Five steps to make your own terrarium
<p><span style="font-weight: 400;">Terrariums have become a popular way to display plants and add a little greenery to your different spaces.</span></p>
<p><span style="font-weight: 400;">Though they may seem complicated, terrariums are quite easy to make, don’t require too much upkeep, and can be made in all sorts of shapes and sizes.</span></p>
<blockquote style="background: #FFF; border: 0; border-radius: 3px; box-shadow: 0 0 1px 0 rgba(0,0,0,0.5),0 1px 10px 0 rgba(0,0,0,0.15); margin: 1px; max-width: 540px; min-width: 326px; padding: 0; width: calc(100% - 2px);" class="instagram-media" data-instgrm-captioned="" data-instgrm-permalink="https://www.instagram.com/p/B_c3wSip_DL/?utm_source=ig_embed&utm_campaign=loading" data-instgrm-version="14">
<div style="padding: 16px;">
<div style="display: flex; flex-direction: row; align-items: center;">
<div style="background-color: #f4f4f4; border-radius: 50%; flex-grow: 0; height: 40px; margin-right: 14px; width: 40px;"></div>
<div style="display: flex; flex-direction: column; flex-grow: 1; justify-content: center;">
<div style="background-color: #f4f4f4; border-radius: 4px; flex-grow: 0; height: 14px; margin-bottom: 6px; width: 100px;"></div>
<div style="background-color: #f4f4f4; border-radius: 4px; flex-grow: 0; height: 14px; width: 60px;"></div>
</div>
</div>
<div style="padding: 19% 0;"></div>
<div style="display: block; height: 50px; margin: 0 auto 12px; width: 50px;"></div>
<div style="padding-top: 8px;">
<div style="color: #3897f0; font-family: Arial,sans-serif; font-size: 14px; font-style: normal; font-weight: 550; line-height: 18px;">View this post on Instagram</div>
</div>
<p style="color: #c9c8cd; font-family: Arial,sans-serif; font-size: 14px; line-height: 17px; margin-bottom: 0; margin-top: 8px; overflow: hidden; padding: 8px 0 7px; text-align: center; text-overflow: ellipsis; white-space: nowrap;"><a style="color: #c9c8cd; font-family: Arial,sans-serif; font-size: 14px; font-style: normal; font-weight: normal; line-height: 17px; text-decoration: none;" rel="noopener" href="https://www.instagram.com/p/B_c3wSip_DL/?utm_source=ig_embed&utm_campaign=loading" target="_blank">A post shared by Terrarium Dreams (@terrariumdreams)</a></p>
</div>
</blockquote>
<p><span style="font-weight: 400;">Here are the supplies you need and steps to follow in </span><a rel="noopener" href="https://www.bhg.com/gardening/houseplants/care/make-a-terrarium/?slide=slide_beeb0402-ca09-4fbc-8f81-e6b770a5c9f9#slide_beeb0402-ca09-4fbc-8f81-e6b770a5c9f9" target="_blank"><span style="font-weight: 400;">creating your own</span></a><span style="font-weight: 400;"> DIY terrarium.</span></p>
<p><strong>Supplies you need</strong></p>
<p><span style="font-weight: 400;">Most of your supplies can be found at your local garden centre, with the exception of the container your terrarium will be created in, which you can find at a craft store.</span></p>
<p><span style="font-weight: 400;">The choice of container can also influence the kinds of plants you can include. Open terrariums being better-suited to dry climate plants, and closed terrariums working best for plants that thrive on moisture and humidity.</span></p>
<p><span style="font-weight: 400;">Aside from a container to house your terrarium, you will need:</span></p>
<ul>
<li style="font-weight: 400;" aria-level="1"><span style="font-weight: 400;">Activated charcoal</span></li>
<li style="font-weight: 400;" aria-level="1"><span style="font-weight: 400;">Potting soil</span></li>
<li style="font-weight: 400;" aria-level="1"><span style="font-weight: 400;">Sheet moss</span></li>
<li style="font-weight: 400;" aria-level="1"><span style="font-weight: 400;">Trowel</span></li>
<li style="font-weight: 400;" aria-level="1"><span style="font-weight: 400;">Plants</span></li>
<li style="font-weight: 400;" aria-level="1"><span style="font-weight: 400;">Gloves</span></li>
</ul>
<p><span style="font-weight: 400;">Once you have your supplies, it’s time to start assembling your new terrarium by following these five steps.</span></p>
<p><strong>1. Build the base</strong></p>
<p><span style="font-weight: 400;">To start with, cover the base of your container with 3-5 centimetres of activated charcoal.</span></p>
<p><span style="font-weight: 400;">This layer helps to both remove odours from the terrarium and drainage to ensure that your plant roots don’t sit in soil that is too wet.</span></p>
<p><strong>2. Mix soils</strong></p>
<p><span style="font-weight: 400;">Once the base is done, mix some of the remaining charcoal with the potting soil. Mixing the two, either with your hands or a trowel, also assists with drainage.</span></p>
<p><strong>3. Next layer</strong></p>
<p><span style="font-weight: 400;">Next, add the mixed soil and charcoal to the container until it is between a quarter and one third full.</span></p>
<p><span style="font-weight: 400;">To remove large air pockets in the soil, gently pack the soil as you add it.</span></p>
<blockquote style="background: #FFF; border: 0; border-radius: 3px; box-shadow: 0 0 1px 0 rgba(0,0,0,0.5),0 1px 10px 0 rgba(0,0,0,0.15); margin: 1px; max-width: 540px; min-width: 326px; padding: 0; width: calc(100% - 2px);" class="instagram-media" data-instgrm-captioned="" data-instgrm-permalink="https://www.instagram.com/p/CA5-cKSHLoE/?utm_source=ig_embed&utm_campaign=loading" data-instgrm-version="14">
<div style="padding: 16px;">
<div style="display: flex; flex-direction: row; align-items: center;">
<div style="background-color: #f4f4f4; border-radius: 50%; flex-grow: 0; height: 40px; margin-right: 14px; width: 40px;"></div>
<div style="display: flex; flex-direction: column; flex-grow: 1; justify-content: center;">
<div style="background-color: #f4f4f4; border-radius: 4px; flex-grow: 0; height: 14px; margin-bottom: 6px; width: 100px;"></div>
<div style="background-color: #f4f4f4; border-radius: 4px; flex-grow: 0; height: 14px; width: 60px;"></div>
</div>
</div>
<div style="padding: 19% 0;"></div>
<div style="display: block; height: 50px; margin: 0 auto 12px; width: 50px;"></div>
<div style="padding-top: 8px;">
<div style="color: #3897f0; font-family: Arial,sans-serif; font-size: 14px; font-style: normal; font-weight: 550; line-height: 18px;">View this post on Instagram</div>
</div>
<p style="color: #c9c8cd; font-family: Arial,sans-serif; font-size: 14px; line-height: 17px; margin-bottom: 0; margin-top: 8px; overflow: hidden; padding: 8px 0 7px; text-align: center; text-overflow: ellipsis; white-space: nowrap;"><a style="color: #c9c8cd; font-family: Arial,sans-serif; font-size: 14px; font-style: normal; font-weight: normal; line-height: 17px; text-decoration: none;" rel="noopener" href="https://www.instagram.com/p/CA5-cKSHLoE/?utm_source=ig_embed&utm_campaign=loading" target="_blank">A post shared by Terrarium Dreams (@terrariumdreams)</a></p>
</div>
</blockquote>
<p><strong>4. Add plants</strong></p>
<p><span style="font-weight: 400;">After removing the plants from their containers, position them on top of the soil with enough space between them for additional soil.</span></p>
<p><span style="font-weight: 400;">Some top picks for terrarium plants include starfish plants, air plants, and nerve plants.</span></p>
<p><span style="font-weight: 400;">For a healthy terrarium, it’s best to choose plants with similar watering and light needs.</span></p>
<p><strong>5. Dress and water</strong></p>
<p><span style="font-weight: 400;">Once the additional soil has been packed in and around the plants so that the roots are covered, position moss on top of the soil and around the plants.</span></p>
<p><span style="font-weight: 400;">Then, give the terrarium a water and place it in a well-lit area with indirect light.</span></p>
<p><strong>Further care</strong></p>
<p><span style="font-weight: 400;">Once the plants have established themselves in the terrarium, little upkeep is needed.</span></p>
<p><span style="font-weight: 400;">As they grow, you may want to trim branches that grow outside of the container, or trim the moss to control its thickness.</span></p>
<p><em><span style="font-weight: 400;">Image: @terrariumdreams / Instagram</span></em></p>